SSH原理
Secure Shell (SSH),是一种加密的网络传输协议,最常见的用途是登录到远程电脑中执行命令。SSH使用客户端-服务器模型,标准端口为22。SSH以非对称加密实现身份验证(关于对称以及非对称加密, 详见参考[2])。从客户端来看,SSH提供两种级别的安全验证:
- 基于密码的安全验证:使用自动生成的“公钥-私钥对”来简单的加密网络链接,随后使用密码认证进行登录。所有传输的数据都会被加密,但是可能会有别的服务器在冒充真正的服务器,无法避免被中间人攻击。
- 基于密钥的安全验证:创建”公钥-私钥对“(e.g. 使用
ssh-keygen命令),通过生成的密钥进行认证。公钥放在需要访问的服务器上(通常在~/.ssh/authorized_keys文件中),而对应的私钥由客户端保管。客户端软件会向服务器发出请求,请求用你的密钥进行安全验证。服务器收到请求后,先在你在该服务器的用户根目录下寻找你的公钥,然后把它和你发过来的公钥进行比较。如果两者一致,服务器就用公钥加密“质询”(challenge)并把它发给客户端软件,从而避免被中间人攻击。
基于密码的安全验证流程
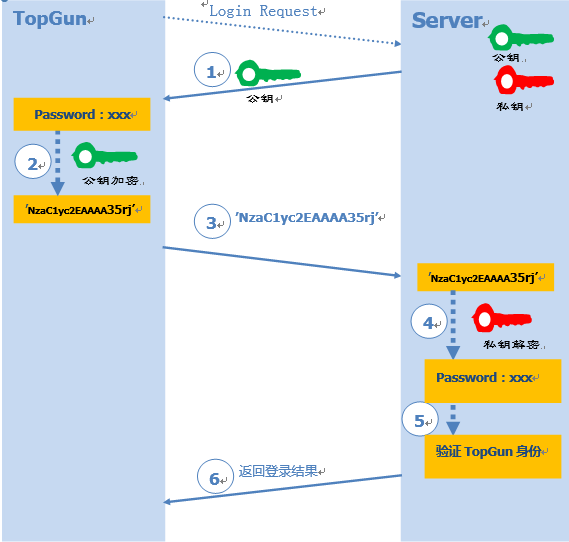
- Server收到Client的登录请求,并把自己的公钥发送给Client。
- Client使用这个公钥将登陆密码进行加密。
- Client将加密后的密码发送给Server。
- Server使用自己的私钥将消息解密得到登陆密码,并验证其合法性。
- 根据验证结果,给Client相应的响应。
基于密钥的安全验证流程

- Client侧生成一对公钥和私钥,并将自己的公钥存放在Server端,追加在文件
authorized_keys中。 - Server收到客户端的连接请求后,在
authorized_keys中匹配到Client事先保存的的公钥pubKey,并生成随机数R,用Client的公钥对该随机数进行加密得到PubKey(R),然后将加密后的信息发送给Client。 - Client通过私钥对消息解密得到随机数
R,然后对随机数和本次会话的SessionKey利用MD5生成摘要Digest1,发送给Server。 - Server也会对同样的
R和SessionKey利用同样的摘要算法生成Digest2。 - Server端比较
Digest1和Digest2是否相同,给Client相应响应。
SSH实践:Github多用户设置(macOS)
生成密钥
ssh-keygen命令用于为ssh生成,管理和转换认证密钥。该命令有几个常用选项,-t用于指定加密方式,可选dsa | ecdsa | ed25519 | rsa, 一般为rsa;-C用于指定注释,通常使用自己的邮件名作为注释;-b用于制定密钥长度,对于RSA加密方式,最低长度为1024(可被破解),默认长度为2048,建议为2048或4096。示例如下:
1 | $ ssh-keygen -t rsa -C "your_email@example.com" -b 2048 |
公钥是一串很长的字符,为了便于肉眼比对和识别,所以有了指纹这东西;指纹位数短,更便于识别且与公钥一一对应。
指纹的用处之一是在使用SSH第一次连接到某主机时,会返回该主机使用的公钥的指纹让你识别。示例:
1 | The authenticity of host 'hostname' can't be established. |
在本机配置多个Github账户
使用以上命令生成两个ssh公钥-密钥对,保存为不同的名称,例如github_user1_rsa和github_user2_rsa。则会生成四个文件如下:
1 | -rw------- 1 username staff 1.8K Oct 28 2019 github_user1_rsa |
配置~/.ssh/config文件如下,如果没有该文件则自行创建一个:
1 | # github user(your_email_1@example.com) |
其中Host字段为HostName的别名,用以区分github_user1和github_user2。git命令会用repo设置中的Hostname来匹配此处的Host别名,如果匹配成功则访问此处Host对应的HostName;
IdentifyFile制定了密钥文件的地址,注意是私钥;
HostName指定了要连接的服务器;
User指定了登录用户名,此处为git。
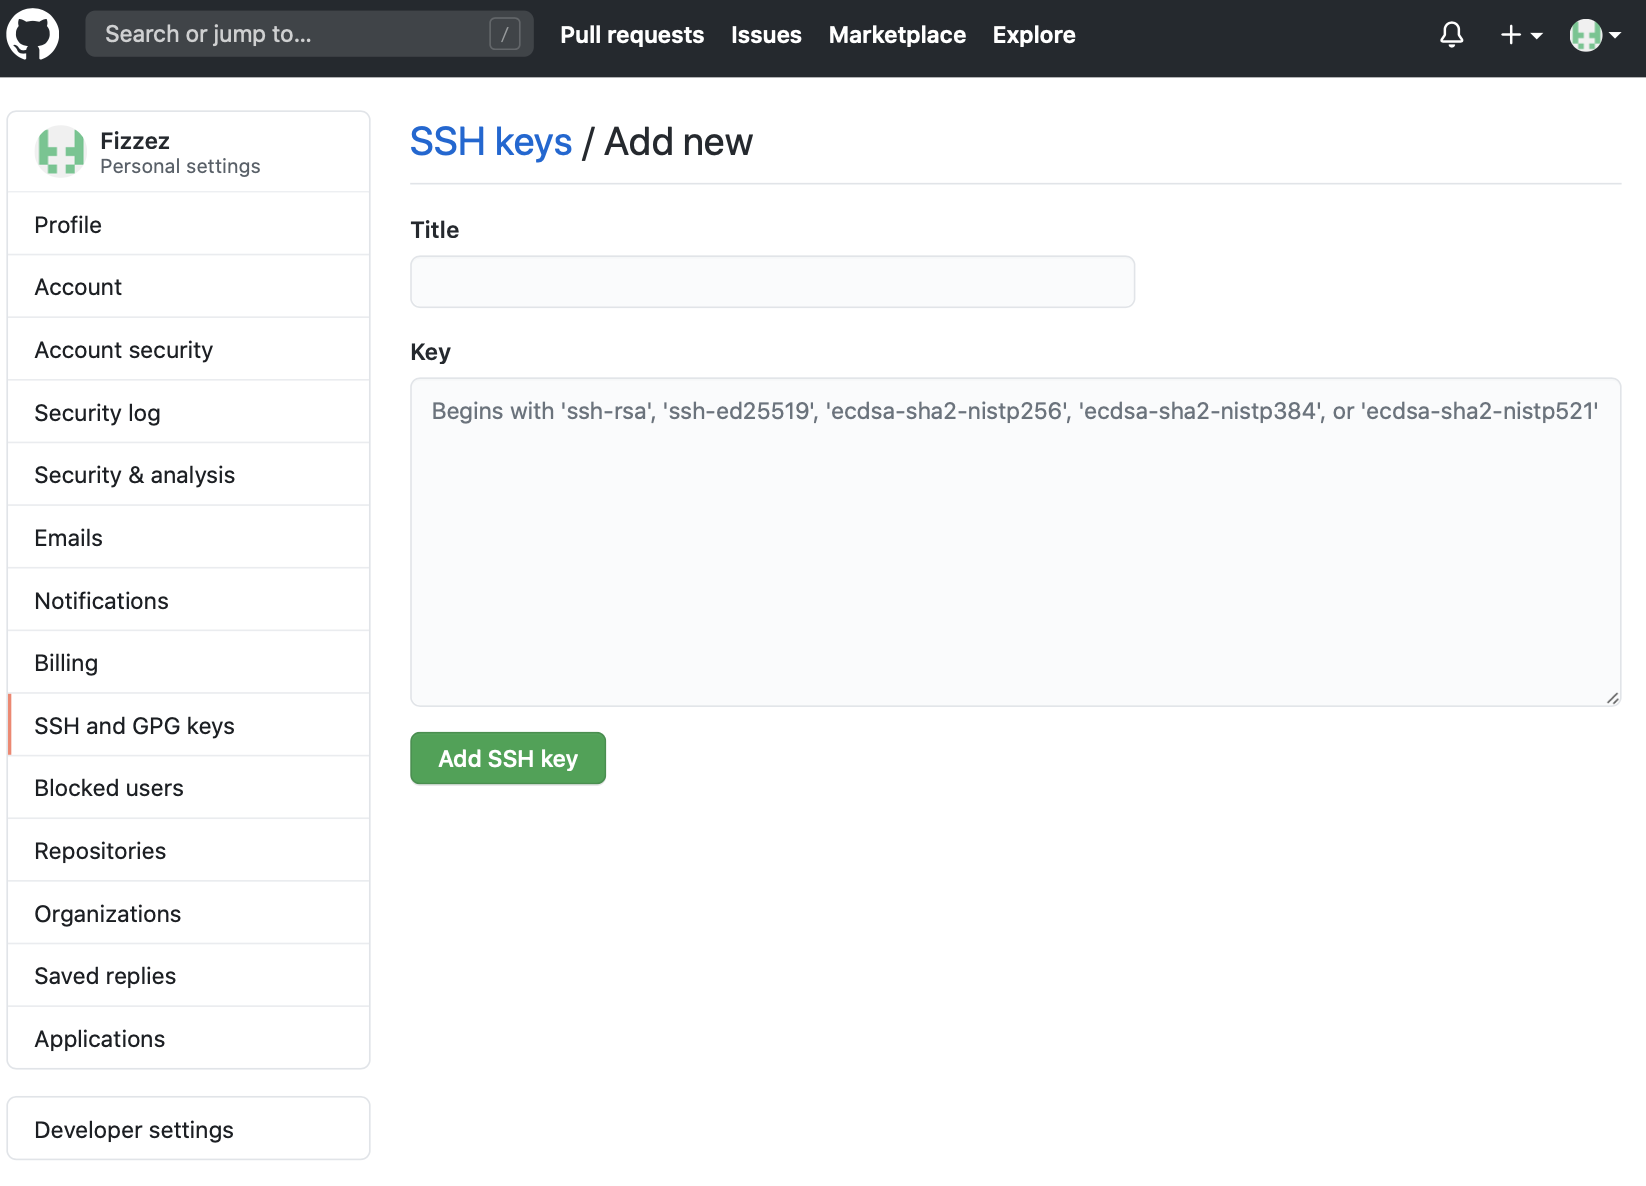
将SSH公钥添加到Github
分别在两个Github账户的Settings - SSH and GPG keys页面添加SSH key。如下图所示,Key字段需要复制粘贴对应的github_user1_rsa.pub或者github_user2_rsa.pub公钥文件中的内容。
测试配置是否成功
使用以下命令测试配置是否成功:
1 | # Address of github_user_1 |
配置成功后的使用
以git clone为例,使用github_user_1的身份进行操作:
1 | git clone git@github_user_1.github.com:fastai/fastai_dev.git |
注意此处git@后的host名为~/.ssh/config中,为github_user_1指定的Host。
如果对已有repo修改push地址,则需要修改repo根目录下.git/config中remote字段内容:
1 | [core] |
因为在上面配置SSH的config文件时,用指定的Host别名替代了原来的Hostname,所以现在应该对不同用户使用不同的Host别名来替代Hostname。
另外,在项目根目录分别设置用户名和邮箱的方法是:
1 | git config user.name github_user1 |